

Before
We started small with the garden box on the right, added the one on the left, and recently decided to expand beyond this.
A few months ago, I shared how my garden kept me busy enough and how I had no plans to expand it. Things changed, however, when my kids received a generous homeschool scholarship this school-year. This scholarship has provided for their curriculum and lots of extra curriculars that we otherwise couldn’t afford. It’s been such a blessing to receive—another reason why I love the great state of Florida— and definitely deserves a post in and of itself. But we found out that some of the spending terms will change next year and all extracurriculars will not be funded. We decided that now is the time to expand our garden if they will pay for it this year. Now each child has a new garden bed, soil, and seeds to go along with it! What a gift. Of course this blesses our family with fresh food but the educational skills that come from gardening are incalculable! It’s brought me so much joy to learn these skills alongside my kids and watch their excitement as we harvest food that we eat the same day.
The struggle I ran into was the design process. If you’ve been following along with my gardening journey, you might recall I was nervous to start a new hobby that may be a flop so Ethan encouraged me to start small. Our first bed was the Vegogarden Kid’s bed and it was only 2’x3.5’. While I was surprised to see how much food I could grow in the small space, the issue I had with starting such a small bed is that I lacked the vision for what our garden could look like someday. I didn’t think beyond what I had before me because I wasn’t sure if this was a journey I would commit to. I really struggled with where to place the 2’x3.5’ and after lugging it around every portion of our yard, eventually decided upon a spot based on sunlight, wind, and visually where I could spot it from my window. It honestly looked goofy smack dab in the middle of such a large, empty space. When I added our 2’x8’ bed, it made sense to continue a line against the fence. But knowing that I would add another 3 beds threw me for a loop which led to many sketches trying to figure out the best placement for everything. If I had some concept in mind from the beginning, I probably couldn’t save myself time and having to work with weird configurations. While I am far from being a gardening expert, I've written this post for the new gardener who isn’t sure where to start when it comes to garden layouts.

1. purchase and place your first garden bed with your dream design in mind.
Before even purchasing a garden bed, I would recommend looking at garden inspiration on Pinterest, getting a general idea of what you might work towards someday, and then making a decision on your first garden bed with the greater picture in mind. Our kids garden bed was an affordable and great place to start, but due to its size it could never be a main focal point of a garden with expansion plans. Worst case scenario, you never expand it but best case you do and already have a plan in place. Reading reviews is helpful to know how your raised bed will hold up in the long term, as well as how it withstands severe weather.

2. Divide your backyard into zones
Backyards that have absolutely nothing in them are super intimidating to me. These kinds of yards are blank canvases with endless possibilities. For some, this may be exciting but for others like me, this is overwhelming. Creating zones helps immensely.
Consider all the ways you plan to utilize the space you have in your backyard. We have a shipping container that we use as a guest space in our backyard so that is one zone, another zone is the garden, and the other zone I created was for a fire-pit and chairs. When each zone has a purpose and when laid out properly, it can tie in the entirety of your backyard to make a magical space.
Once you’ve determined the “zone” for your garden, use graph paper or an online program like Canva to draw up and move around your beds to see how the spacing and positions look. Take into consideration where the sun rises and sets, where your water spicket is located, and if there will be shade from a fence, building, or home. Move things around until it makes sense both visually and practically.
The fun part is dreaming up and filling in the rest. In my “grand plans” that may never happen, I’ve also made space for a swimming pool, a row of blueberry bushes alongside our house, and a fruit tree. While these things may not happen, I can at least be mindful of the space I’m using in case we ever have the opportunity to add these items in.
How I Configured Our Plans
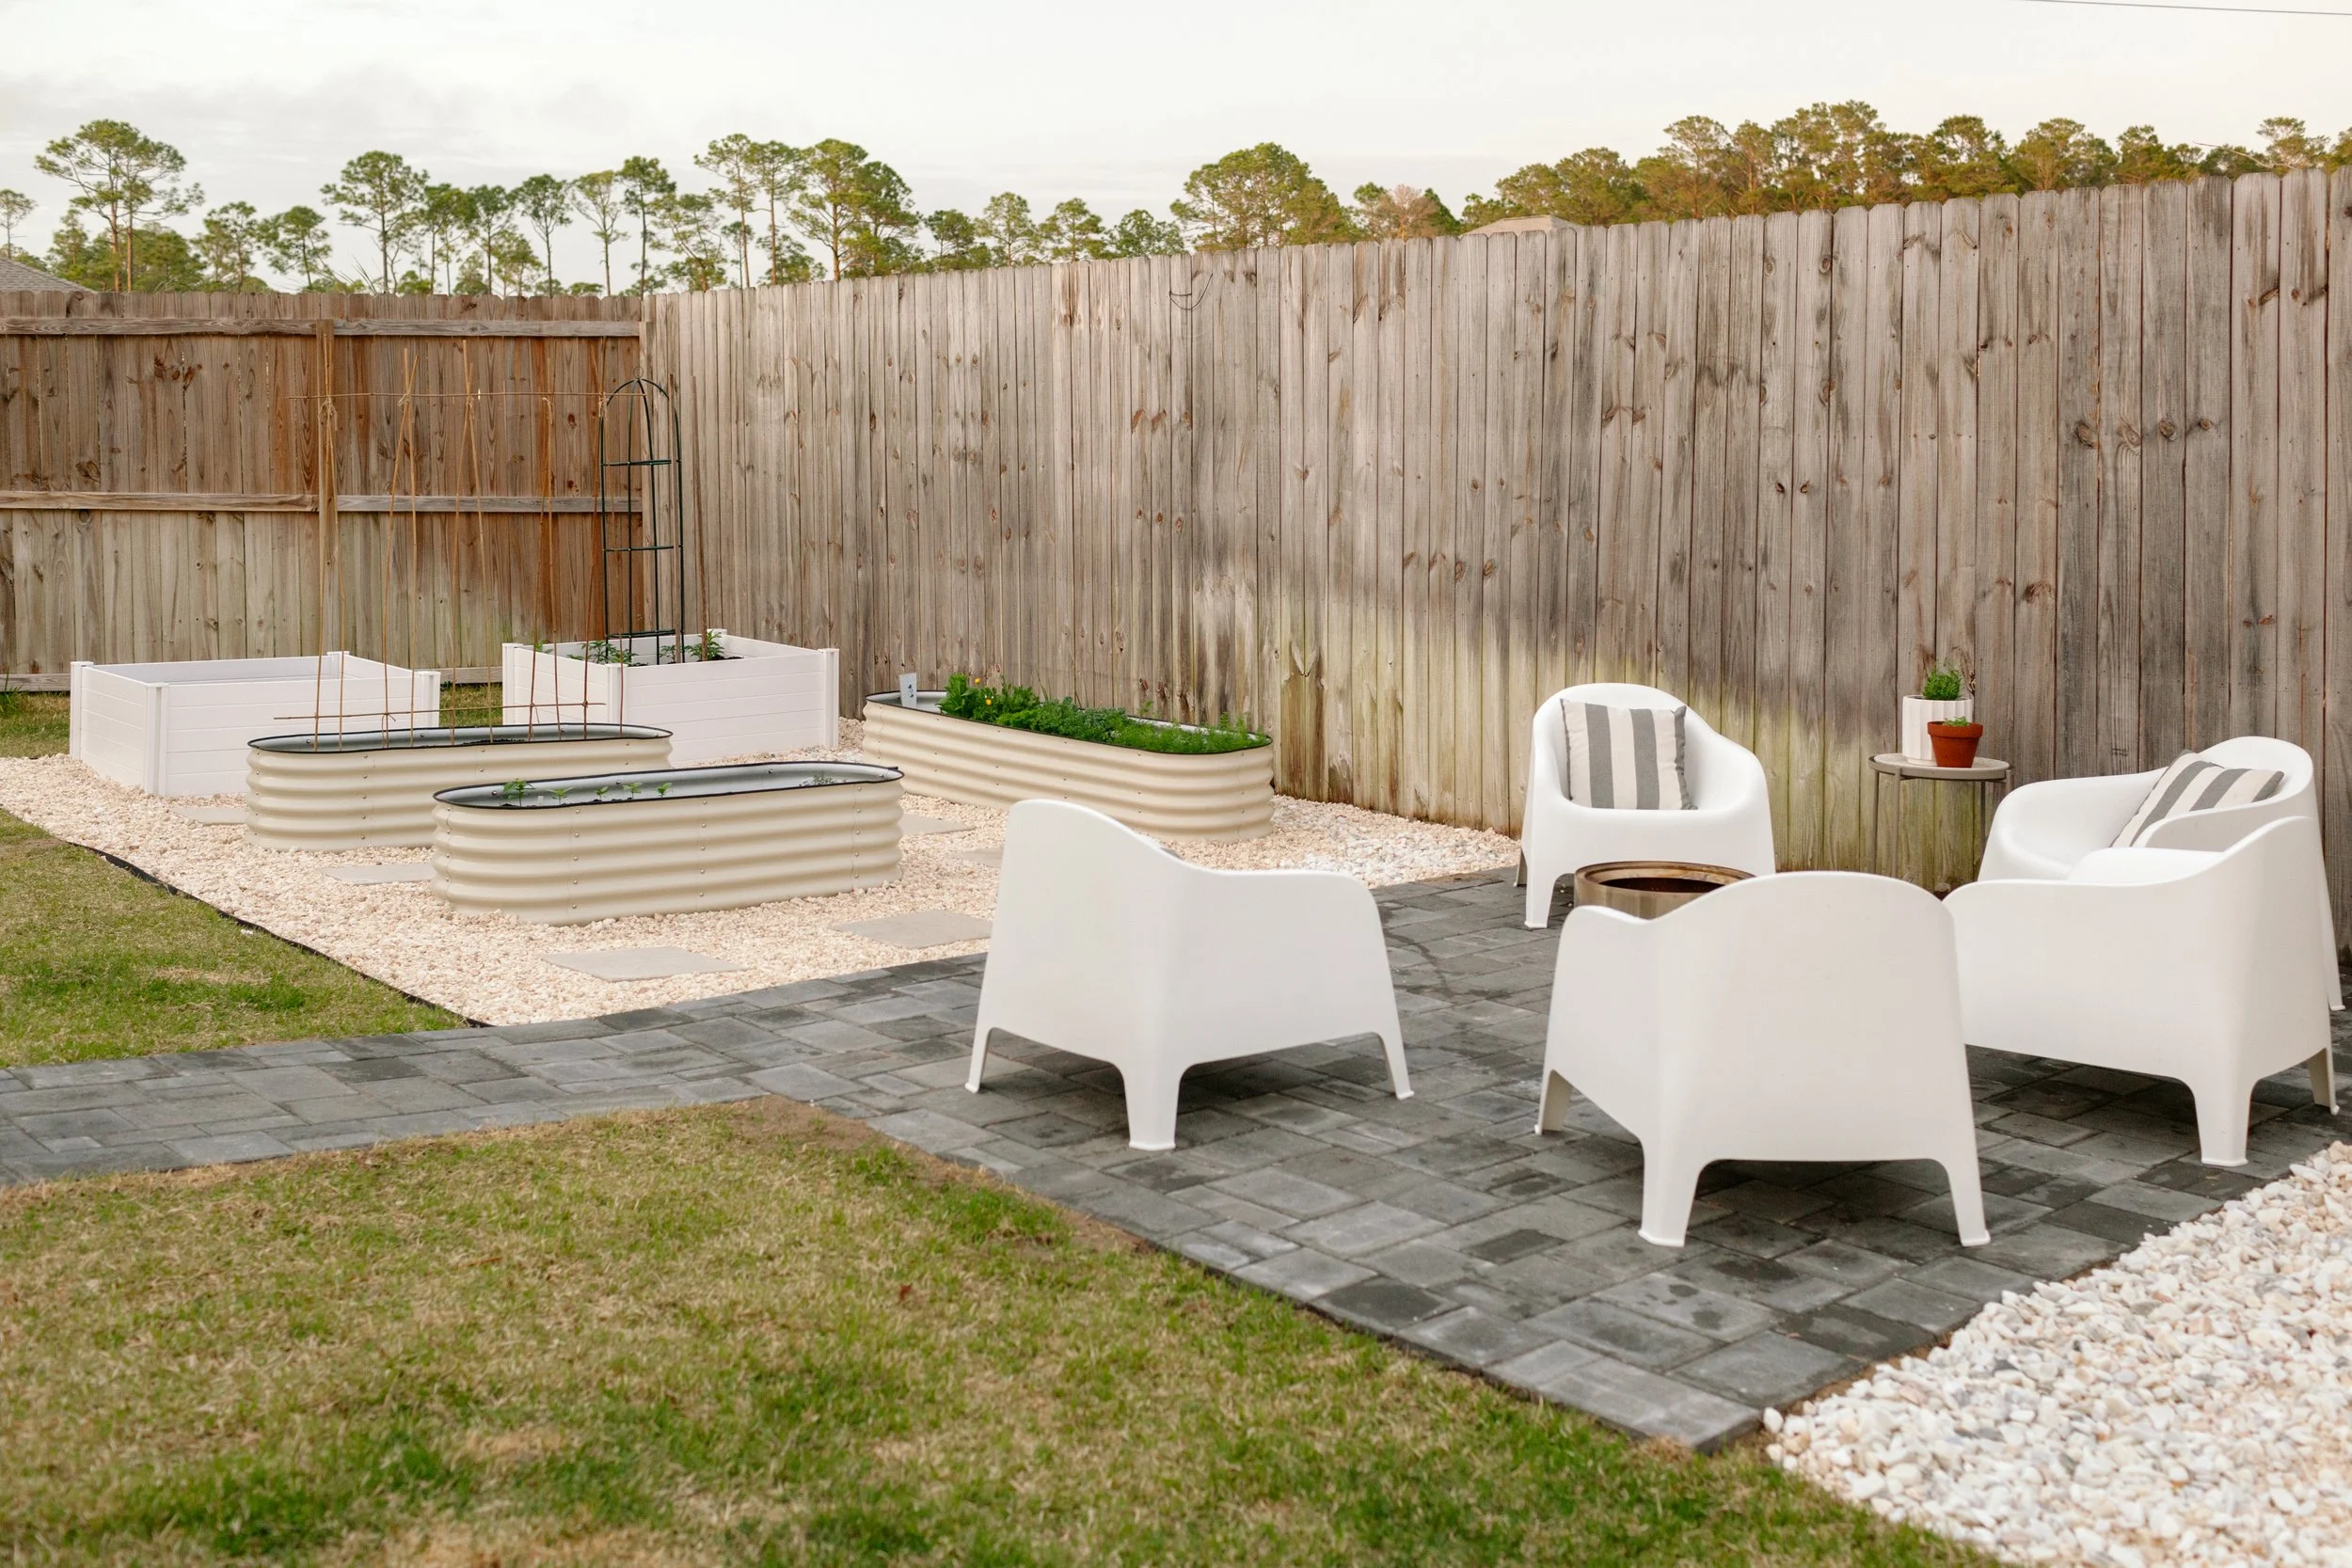
I decided to base everything off of our long 2’x8’ bed. I knew I needed to uproot the small kids bed next to it but had no desire to do that with the longer bed as I had plenty of plants growing in it. This meant that my entire design would be based off the location of our 2’x8’ bed.
My friend Bethany has these beautiful vinyl 4’x4’ garden beds. Since the scholarship would cover them, I decided to go big and add those into our plans. I wanted to break up the metal raised bed look with something that would match our house and add a pop of white by our dull, wooden fence. Mixing these in meant playing around a lot with placement. The small kids sized beds were hard to work with and, thankfully, Vegogarden offers extension pieces to lengthen beds. My 2’x3.5’ bed became a 2’x5.5’! We ordered a second kids bed with extensions to match alongside it. (Kids beds are 50% off if you post photos on social so this was the best deal.) Those new dimensions helped me moved things around “on paper” so that when it came to set up time, there was less physical re-configurating saving us time and muscle.

Ethan brought home some large pavers and we played around with adding some stepping stones between the beds. I loved how it came together and figured maybe someday we could add in a slab of pavement and a fire pit. Things started to take shape! And then the big surprise…guess what Ethan decided to gift me for our 15th wedding anniversary? He took the plans I had dreamed up and made them a reality! He contracted out the walkway from our door all the way down to firepit area. He also decided to to tear up the sod and add in gravel to tie it all together!

3. Create a budget, stick with it, and add to your garden over time.
There are certain items you simply need in a garden in order to have success: good soil, quality seeds, trellises, and so forth. However, you don’t necessarily need the gravel surrounding the beds and that is something that can be added down the road. Prioritize what matters most. I love using spreadsheets to calculate how much everything will cost based on the bed size. Sometimes soil and rock is cheaper to buy in bulk from a local landscape business than from Home Depot or Lowe’s. Shop around and do your calculations to save you from making multiple trips.

Save Money on Soil
One way to save money is to “lasagna garden.” Fill your beds with wet cardboard (no glossy cardboard or tape), a branches and sticks (no pinecones or anything with seeds), top with some leaves (try to avoid trees spray with pesticides), spray with water, and repeat once more before adding your soil. These items will break down and give you rich soil underneath. I know this to be true because after uprooting one of our kid’s beds, the soil underneath was black and rich!

4. Invite others to help
This was such a fun family project to work on. While my kids may not say they had loads of fun—ha!, I really believe this kind of labor is beneficial for families as it gets you outside, requires working with hands, and gives a sense of accomplishment when it’s finished. Our kiddos were such a big help. Kaiden did a lot of heavy lifting and the girls helped with smaller tasks like securing the edging and helping me cut landscape fabric.
I also enlisted help by asking friends for bags of leaves and a farmer friend who gave me lots of compost to mix into our beds. You never know what others have or don’t need unless you ask!
Lastly, teaching others to garden is a great way to build relationships and implement Titus 2 discipleship. Ask younger women to help you on a project if you don’t have helping hands within the home.
5. Enjoy the fruit of your labor!
It’s all finished now and I couldn’t be happier!!!!!!!! We’ve spent time in this space every day since we finished sowing seeds, picking small weeds, checking on our plants, and watching things grow. On cool mornings, I hope to read my Bible out here or share coffee with friends and on cool nights, we plan to make s’mores and enjoy a nice fire.
We are thinking about adding some string lights and maybe even a white picket fence. I look forward to sharing pictures in a few months when, Lord willing, these beds will be filled with a variety of herbs, veggies, and flowers. Even if not, it will certainly be a space to do morning devotions, share coffee with others, and cultivating a love for gardening in my kids.


